To create a blog for students, decide who will own it and who may read it, choose a suitable platform, build a simple site, and publish a checked first post. A personal student blog can showcase interests or project work. A class or club blog also needs an agreed editor, contributor permissions and a review process before work reaches its intended audience.
Choose your route below, then follow the nine steps. You do not need a custom domain, a paid theme or a public audience to begin. For a school-directed project, use the institution’s approved services and publishing rules before asking students to create accounts or upload work.
Route
Settle first
Useful first version
Personal student blog
Who owns the account, address and work? Is it independent or a course assignment?
A short About page and one substantial post or project reflection, with an appropriate contact route.
Class publication
Who approves the platform, audience, names, images and publication? Who reviews submissions?
A class introduction, clear contribution rules and a reviewed sample post.
Club or student team
Who holds the account and domain when members leave? Who can publish and moderate?
A shared purpose, named editor, submission process and handoff record.
Write a short brief before picking a theme. For example, an illustrative class brief might be: “Publish weekly project reflections for approved classmates; each post explains a question, evidence, a revision and one peer-feedback question.” A personal blog might instead document a coding project or book discussion for a public portfolio. These are planning examples, not reports of actual student outcomes.
Define the task: reflection, a subject explanation, a project log, a reading response or a club update. Decide what makes a post useful for that audience.
Choose the audience deliberately: the author and teacher, invited classmates, a wider school community or the public. Public promotion is optional.
Name the account owner, editor and support contact. For a school/club publication, use the institution’s account-management policy rather than one departing member’s personal credentials.
For an independent student blog, decide what you want to keep after a course ends. Check permission before republishing assessed, confidential, group or institution-owned material.
Set a realistic first checkpoint: one reviewed post that works for the intended reader, rather than a promised grade, traffic figure or posting streak.
2. Choose a platform that fits access, cost and responsibility
For a class blog, ask the institution about approved tools first. Test the actual plan and account type with a sample post. You need to know who can draft, edit, publish, invite readers, export work and recover the account. A product marketed for websites is not automatically an approved learning-management system or a private classroom.
Option
A suitable use to evaluate
Verify before committing
Institution-provided service
A course or school publication using an already approved environment.
Available blog/page functions, audience controls, student access, accessibility support, retention and export rules.
WordPress.com
A hosted personal blog or a publication whose required workflow is supported by the chosen plan.
Its current visibility settings include public and private-to-approved-users modes. Confirm account, invitation and plan requirements for your class. Official visibility guide.
Grigora
A hosted public student portfolio, club site or editorial blog, subject to the institution’s requirements.
Website publishing starts with a trial; paid website plans include hosting and connection of a domain you own. Check current allowances and whether the exact access/workflow you need is supported. Do not assume classroom permissions, a gradebook or school SSO. Current plan terms.
Self-hosted software
A project with someone responsible for hosting and ongoing maintenance.
Hosting, updates, backups, account recovery, access controls, accessibility and the person who will support it during and after the course.
Platform descriptions were checked on 2 November 2026. Compare the complete cost for the period you need: renewals, domain registration, media storage, optional tools and support. A hosted service address may be enough. Keep a student’s independent site separate from school-owned accounts where appropriate, and check age/account terms before signup.
If you choose Grigora, use instructions for the editor on your site. AI-built websites use CMS collections and connected layouts; classic visual-builder sites use the CMS and compatible blocks. The classic post guide identifies its legacy scope. Create a test article and inspect its listing and full page before inviting contributors or paying for a domain.
3. Build a simple site and set its actual visibility
Choose a short name and address that describe the project without exposing unnecessary personal information. For an independent blog, use a name you are comfortable owning beyond one assignment. For a class or club, follow naming and branding rules. If using a custom domain, record its owner, renewal contact and billing responsibility; connecting a domain and registering it are separate tasks.
Home or post index: explain the purpose and show the newest or most useful posts. Use a few meaningful subject/project categories.
About/contribution guidance: explain the audience, authorship format, review process and how corrections are handled.
Contact or support: use an appropriate monitored route without publishing a student’s personal phone number or private address.
One draft article: include realistic headings, an image if useful, a source link and the author label you intend to use. Test it before building many empty pages.
Set both the site and post visibility for your chosen audience. A published post inside a private site is not necessarily public. A draft preview link may allow a limited kind of access without publishing. Conversely, an unlisted address or a request that search engines not index a page does not provide access control: someone who obtains a public URL may still read it.
Apply best practices for online privacy to the actual account and audience. Use the platform’s supported authentication/invitation controls when access must be restricted, then test an authorized reader and a signed-out visitor. Avoid relying on hidden menu links, obscure URLs or a noindex setting to protect student work.
4. Plan useful posts around the course or your interests
Choose topics that match the brief and can be supported with available material. A personal blog can follow a student’s genuine interests; a class publication may use an assignment or subject theme. Agree on scope and time before asking for a steady flow of posts. A manageable schedule leaves room for reading, drafting, feedback and corrections alongside study.
Format
A concrete prompt
Material to prepare
Project reflection
What did I try, what happened, and what would I change?
Your own notes, method, appropriate evidence and a clearly stated limitation.
Subject explainer
How would I explain this concept to someone at the intended level?
Reliable sources, an original explanation and a worked example you can check.
Reading response
Which argument or passage am I responding to, and why?
Accurate source details, a short relevant reference and your own analysis.
Club update
What happened, what may be shared, and what should members do next?
Confirmed event details, approved images and a relevant next action.
Use a small calendar with topic, author, draft date, reviewer and intended publication date. For a group, avoid giving several students identical work by accident. If a deadline clashes with exams, adjust the editorial plan rather than publishing unchecked filler. No universal posting frequency guarantees search visibility or academic improvement.
5. Draft a post that shows reasoning and sources
Start with the question or purpose, then explain the work in an order the reader can follow. Use this worksheet as a flexible structure rather than a required essay formula:
Question or task: what does this post explain, examine or document?
Context: what does the intended reader need to know? Keep private course/student details out of the draft.
Evidence or process: show the relevant method, observation, calculation, example or source. Label hypothetical examples and do not invent results.
Explanation: connect the evidence to your point in your own words. Distinguish a source’s claim from your observation or interpretation.
Limits and reflection: what remains uncertain, what changed during the work, and what would you try or read next?
Sources and reader question: provide useful references and, if feedback is wanted, ask a specific question rather than “Any thoughts?”
Use proper citations for the sources and material you rely on, following the course’s required style where applicable. Link the original source when practical and include enough information to identify a book, article or dataset. Check quotations against the original. A citation does not by itself grant permission to reproduce a photo, long passage or someone else’s work; use material you are entitled to publish.
Follow your institution’s rules on AI assistance and disclosure. An outline or language suggestion still needs a human check against the sources and assignment. Do not let a generated draft invent a source, experiment, interview, personal experience or quotation. If the task assesses your own writing or reasoning, make sure your use is permitted before incorporating it.
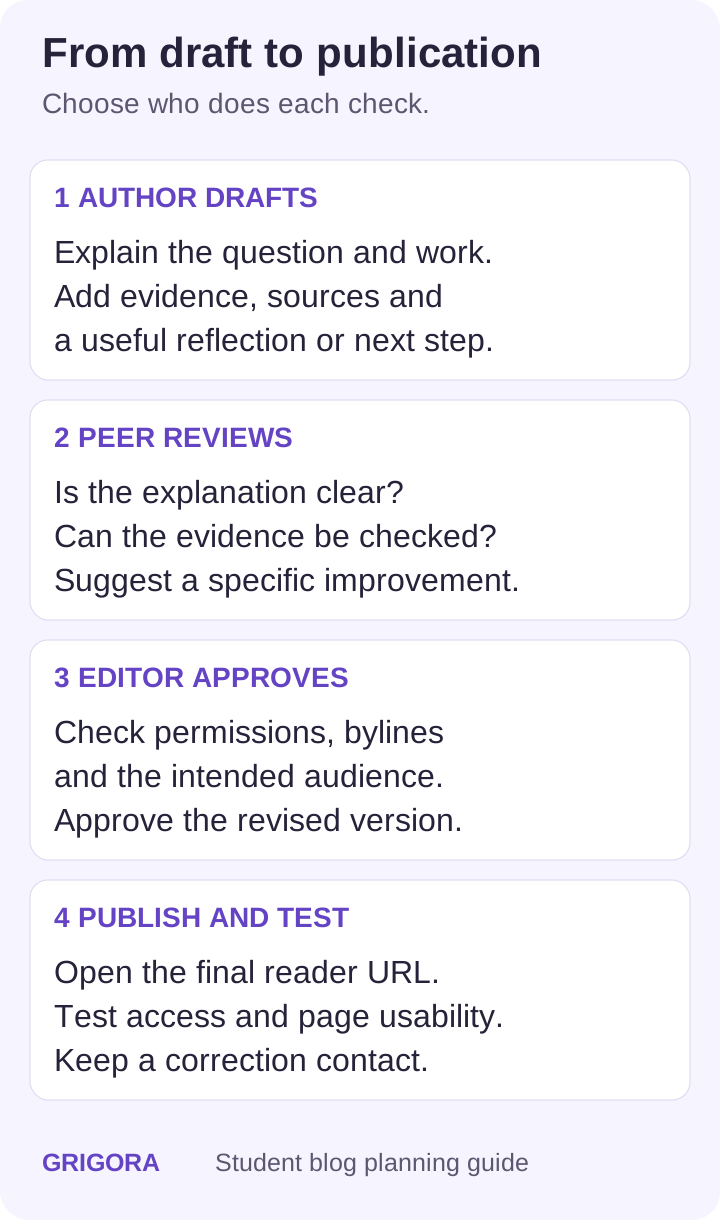
For a personal blog, the author can run the checks alone or ask a trusted reviewer. For a class or club, separate responsibilities: contributors draft, peers give feedback, and an authorized editor reviews the version that will be published. Use the platform’s available roles where they fit. If it cannot enforce the necessary boundaries, collect drafts in an approved workspace and have the editor publish them. Do not share one password among the class.
An illustrative editorial workflow for a shared blog. It does not represent a particular platform’s permissions or a completed student assessment.
Review area
Ask before publication
Purpose and explanation
Does the post answer its question for this audience? Where does it need a clearer example?
Evidence and attribution
Can the important claims and quotations be checked? Are sources and media rights recorded?
Privacy and permissions
Are author names, images, work samples and linked files approved for the chosen audience?
Readability and access
Do headings, links, alt text, captions and the phone layout help a reader use the post?
Editorial decision
Who makes the final changes, who approves them, and who handles a later correction?
Decide whether comments are needed. If enabled, document who moderates, what constructive feedback looks like and how a concern is reported. Avoid requiring public disclosure of grades, personal difficulties or identifiable feedback about classmates. Keep assessment and private teaching feedback in the approved course environment.
7. Review privacy, permissions and data collection
Before publishing names, photos, voices or work, follow the institution’s approval/consent process and any applicable requirements. Collect only what the project needs. Check bylines, image backgrounds and metadata, downloadable documents, embedded media and form fields, not just the visible paragraph. Keep a way to request a correction or removal, and make the agreed audience clear.
For US school projects, requirements depend on the institution, service and information involved. US Department of Education guidance explains that a photo/video may be an education record when directly related to a student and maintained by the institution or a party acting for it; the context matters. This is not a rule that every student photo is automatically public or automatically forbidden. Have the school resolve its publication basis.
FTC COPPA guidance addresses covered operators collecting information from children under 13. School consent on a parent’s behalf is limited to the educational context and does not authorize unrelated commercial uses. Do not treat a teacher’s signup, a site privacy page or a general platform label as blanket approval. Ask the institution to evaluate the service, terms, data practices and required permissions. Other jurisdictions and state rules may differ.
An embedded quiz, analytics tool or newsletter form may add another service and data flow. Use only approved tools that add something the project needs, check their access and data requirements, and provide an alternative where required. Do not collect marketing subscribers or enable advertising simply because a general blogging tutorial suggests monetization.
8. Check accessibility and publish a tested first post
Use W3C’s preliminary accessibility checks as a starting point: clear page titles and headings, appropriate text alternatives, readable contrast, keyboard access, text resizing, labeled forms and multimedia alternatives. These quick checks do not establish complete accessibility conformance. Include the institution’s fuller review process and any needs identified by readers.
Read the page on a phone and larger screen. Check text size, table scrolling, navigation and image labels without requiring a reader to decode a small screenshot.
Use logical heading levels and descriptive link text. Explain essential information in text as well as in a diagram.
Use appropriate image alternatives and captions. For instructional video/audio, provide the necessary captions/transcript or equivalent accessible material.
Try the page and its controls using a keyboard. Enlarge text/zoom and check that content and essential actions remain usable.
Check source links, media permissions, bylines and the final version after revisions. Test any embedded tool without exposing real student information.
Publish the approved version to the agreed audience. Open the final URL as an intended reader; for a restricted blog, also check that a signed-out visitor cannot access protected content.
For a public personal or club blog, use an accurate title, distinct description, sensible categories and relevant links between posts. Share it through channels that suit the purpose and follow school/community rules. Publishing makes the page available according to its access settings; appearing in Bing or Google requires search-engine discovery and indexing; timing and inclusion vary.
9. Maintain the blog and plan a term-end handoff
Name an owner for corrections, reader questions, broken links, moderation and account recovery. Review whether the publishing pace is workable and whether the posts meet the brief. For a learning project, ask whether the explanation or evidence improved during revision rather than treating page views as a measure of learning. Any reported results should come from the actual project, not a template example.
Agree what will remain public, stay restricted, be archived or be removed when the course or club role ends. Follow the institution’s retention rules.
Export or retain permitted work using the supported process. Test that the files include the material students are entitled to keep; do not promise every export preserves every feature.
Transfer approved account/domain responsibility and record renewal dates. Remove departing users’ access through the institution’s process.
Check linked documents and third-party tools as well as the blog itself. An old public file may remain available after its menu link is removed.
For an independent student site, keep recovery details and renewals under the appropriate owner, and obtain permission before moving group or assessed work to it.
Frequently asked questions
Choose a subject and audience, select a platform whose account terms fit, and make a simple About page plus one useful post. Check sources, permissions and privacy before publishing. Keep independent account/domain ownership clear and follow course rules if using assessed or group work.
No. A suitable hosted address may be sufficient for a personal or class project. If you buy a domain, record who owns it and pays renewals. Domain registration does not replace hosting, publishing or access controls.
Only if that audience fits the project and the necessary approval/permissions are in place. A restricted class audience can be the better fit. Choose visibility deliberately and test the result with an intended reader and a signed-out visitor.
No. Noindex asks a supporting search engine not to index the page; it does not authenticate readers or prevent access to an otherwise public URL. Use supported access controls when work must be restricted.
That depends on the agreed workflow and supported permissions. For a reviewed publication, let contributors draft and have an authorized editor approve/publish. If the platform cannot enforce the needed roles, collect drafts elsewhere in an approved environment rather than sharing one password.
Choose a purpose-linked task such as a project reflection, subject explanation, reading response or club update. Include reasoning, evidence, relevant sources and a useful next question. Label hypothetical examples and avoid invented experiments or personal experiences.
Follow the institution’s policy and the assignment’s requirements. Check any generated suggestion against real sources and your own work, and make any required disclosure. Do not use it to invent evidence, citations, interviews or experience.
Agree on retention, access, allowed student copies and ownership before the end. Export permitted work, transfer approved responsibilities and review linked files/tools as well as the site. Independent student portfolios and school-owned publications may need different arrangements.
Get the next guide by email
Practical writing on building a site, growing an audience and sending email people open. No more than one a week.