You can begin with familiar local routes and a modest publishing schedule. You do not need to travel constantly, buy expensive camera gear or claim expertise you do not have. Hiking conditions, access and regulations can change, so the research and maintenance process matters as much as the launch.
Start a Blog Karan Singh BhakuniUpdated 3 Nov 2026
How to Start a Hiking Blog: Useful Trail Guides and a Launch Plan
Karan Singh BhakuniUpdated 3 Nov 2026- 12 min read
- 9 sections
- 3 comparison tables
- 7 questions answered
The short answer
Start a hiking blog by choosing a reader and region you can serve, setting up a readable site and publishing original, well-documented outdoor content. The useful part is not just describing a beautiful walk: it is explaining what you observed, when you visited, where current official information lives and what readers still need to check for their own trip.
Want the site rather than the reading? Build one free with Grigora
Contents9 sections
Read nextHow to Start a Wellness Blog: A Responsible Launch Plan
Choose a focus you can document honestly
Define the reader, geographic scope and type of help you can provide. “Walks I can revisit by public transport near my city” is a more workable starting point than “every great hike in the world.” Your niche should reflect what you can actually observe and research, not only what a keyword tool predicts might receive traffic.
| Possible focus | Useful original material | Limits to make clear |
|---|---|---|
| Local day hikes | Firsthand trail notes, approach details, dated photos and links to the land manager. | A visit records conditions on that date, not a guarantee for the reader’s trip. |
| Personal hiking journal | What you experienced, decisions you made and lessons you learned. | One person’s experience is not universal safety or route advice. |
| Gear for a defined use | Actual testing conditions, fit, use period and drawbacks. | Do not call a specification summary a field test or generalize personal fit to everyone. |
| Access-focused reporting | Observed surfaces, gradients, barriers, facilities and precise source information. | Avoid universal “accessible” or “easy” labels based only on your own ability. |
| Outdoor learning | A transparent beginner’s learning process with qualified sources. | Learning publicly does not make you a technical instructor or emergency authority. |
Keep hiking and technical mountaineering distinct. If a topic requires skills you cannot assess, do not fill the gap with confident instructions. You can describe your experience, cite qualified guidance or choose a narrower topic. Passion is a reason to write; it is not a substitute for competence.
Set up a simple site that works on a phone
Choose a hosted platform or a self-hosted setup according to your budget, maintenance capacity and publishing needs. Compare actual plan terms, renewals, image storage, authoring, export and domain options. A hiking blog does not require a particular paid theme, plugin bundle or platform to be legitimate.
A memorable name is useful; putting a hiking keyword in the domain is not a ranking guarantee. You can consider a provider address before committing to a custom domain. Our domain and free-address guide explains those choices, while the ongoing cost guide helps you account for renewals and maintenance.
Grigora is one option for publishing pages and CMS articles with included hosting. Check the current plans and limits for your actual project. Whatever builder you use, start with readable article pages, clear categories and a useful route to corrections. A large animated hero or elaborate logo is less important than a guide a reader can scan on a small screen.
- About: Explain the region and type of hiking you cover, your relevant experience and the limits of your advice.
- Trail or topic index: Organize by actual reader needs such as region, route type or subject. Keep labels consistent.
- Contact and corrections: Provide a monitored way to report errors; do not present it as an emergency contact service.
- Editorial and commercial information: Explain firsthand testing, update practices, sponsorship and affiliate relationships where applicable.
- Article layout: Put the visit date, key context and official conditions link where readers can find them, rather than burying them after a long story.
Build a trail-guide record before writing
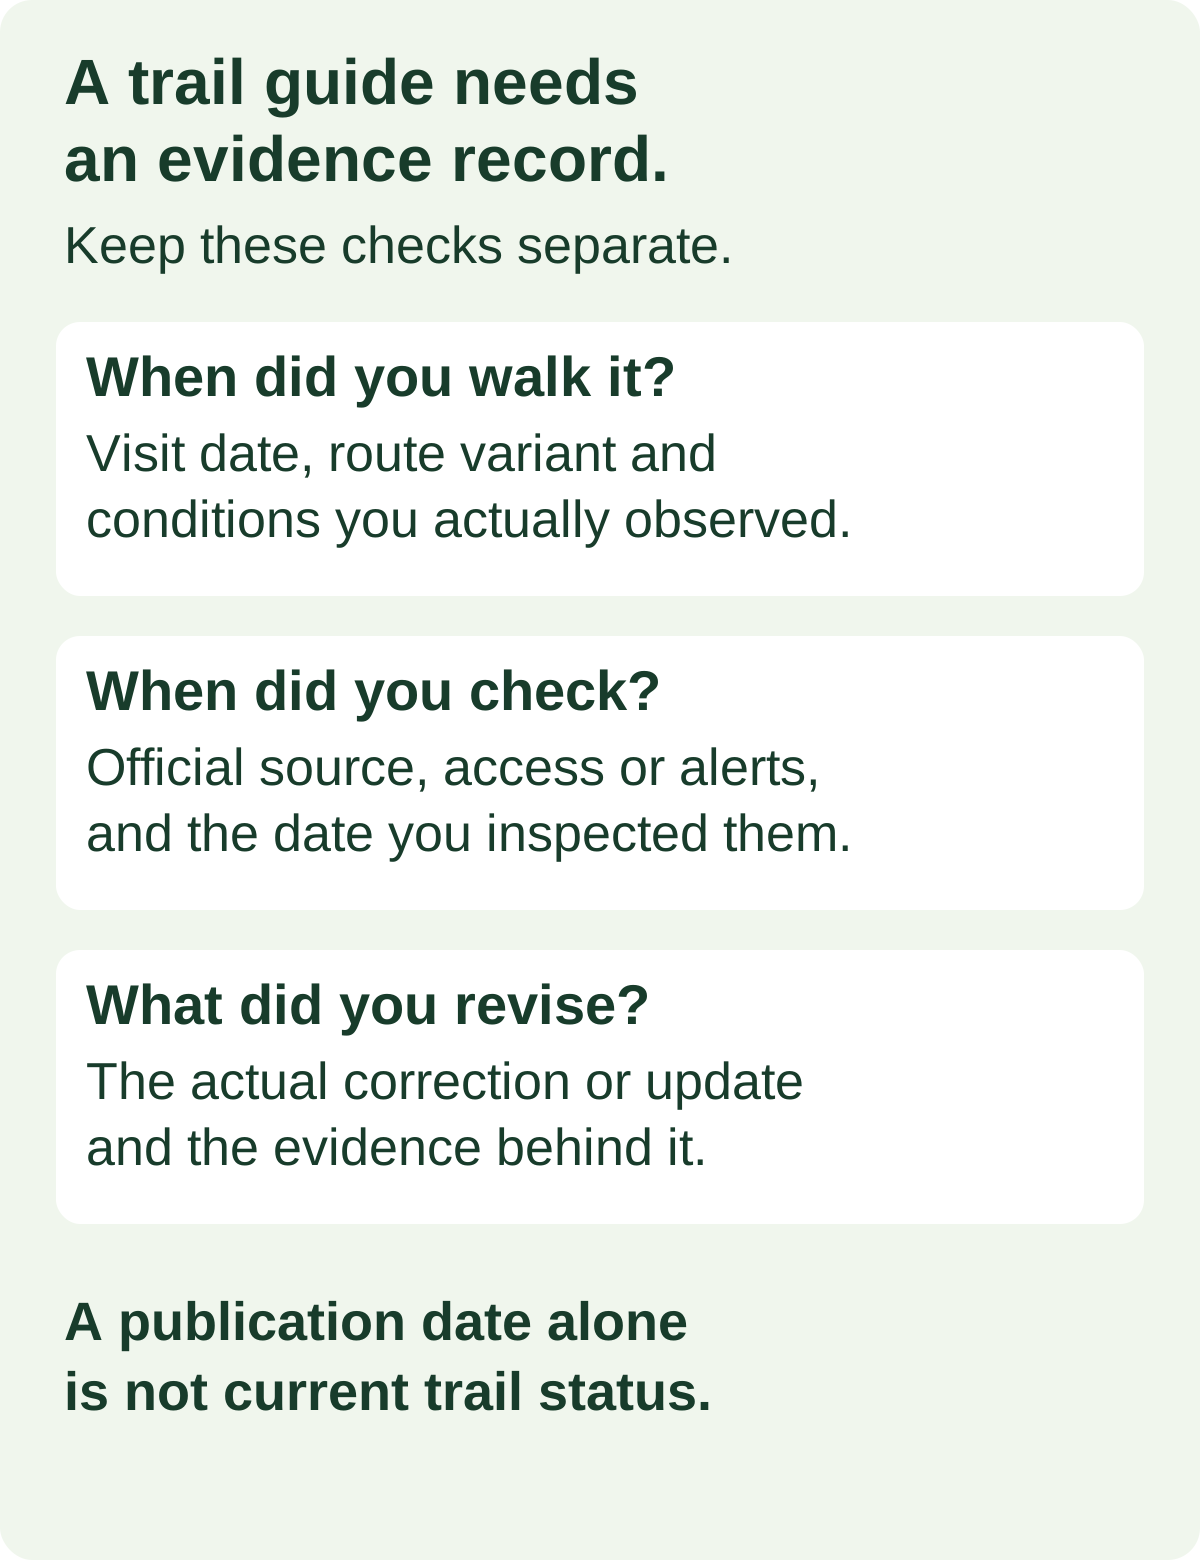
Use a repeatable research record for each route. It helps you avoid copying another guide’s measurements or presenting an old visit as a current inspection. Start with the land manager’s official route, access and alert information; supplement it with clearly attributed observation.
| Field | What to record |
|---|---|
| Route identity | Official route name, location and the particular variant you covered. Avoid mixing several alternatives into one unexplained distance. |
| Distance and elevation | Units, route type, measurement source and whether it describes a return trip, loop or one-way segment. Label estimates and explain differences between sources. |
| Firsthand visit | Date walked, season, relevant conditions and what you personally observed. Do not invent a visit. |
| Current official check | Land-manager route page and alerts, access or permit information, with the date checked. Link the reader to the live source. |
| Route context | Observed terrain, notable barriers, navigation challenges and limitations of your description. Explain terms such as “easy” rather than treating them as universal. |
| Practical approach | Trailhead or transport information, facilities and known constraints, with the source/date. Avoid claiming parking or facilities are always available. |
| Media and rights | Your original photos/captions, permission for other material and map attribution or licensing where relevant. |
| Review triggers | A closure report, changed access rule, new official notice or substantive reader correction that requires investigation. |
Do not claim that an uploaded GPS track, route screenshot or blog description is a live navigation or safety system. Be clear about its source and limitations, and direct readers to the relevant official planning information. A statement that a route was open on your visit does not establish that it is open now.
Make the first guide useful without overstating safety
Open with what the guide covers, who it may help and the dates and conditions behind it. Give readers a short summary and organized sections for approach, route context, your experience, photographs and sources. Personal narrative can add value, but a practical guide should not require scrolling through unrelated material to find essential context.
Planning matters for short and familiar hikes too. The U.S. National Park Service’s Hike Smart guidance emphasizes knowing your limits, planning, checking weather and alerts, and not relying on cellular coverage. Link appropriate current local guidance rather than imply casual hikers need minimal planning. Conditions and official instructions for the actual location take priority over a general blog post.
Keep safety statements within what you can substantiate. Avoid “safe for everyone,” guaranteed completion times or technical advice inferred from one successful trip. Report your own timing with context if useful, but do not convert it into a promise. If a reader asks about a hazard you cannot assess, point them to the responsible authority or a qualified source.
When using AI to outline or edit, verify every route name, distance, access rule and factual claim against actual sources. Do not generate missing trail observations, fabricated field tests, official-looking maps or hazard assessments. If you have not been there, say so and distinguish a researched overview from a firsthand report.
Also worth readingHow to Start a Travel Blog: A Practical Launch Plan
Use original images and share places responsibly
Your photographs can explain a surface, junction or relevant feature better than a decorative stock image. Use captions giving the context and date where it matters, descriptive alternative text and appropriately sized files. Check images and diagrams on a real phone-width layout before publishing. Do not alter a documentary photo in a way that hides an important obstacle or misrepresents conditions.
Obtain appropriate rights for maps, photos and other material; an image being available in search does not give you permission to republish it. Use the map provider’s permitted sharing or embedding method and required attribution, and provide a useful text explanation alongside it. Do not draw an invented route over an attractive landscape image.
Consider the impact of publication on the place and the people in your photographs. Follow the relevant land manager’s rules and the Leave No Trace educational guidance. Avoid encouraging off-trail access, crowding fragile sites or disturbing wildlife for a photograph. Keep sensitive location details out when publishing them would be inappropriate; do not promote “secret” access around a closure.
Publish a small connected set of articles
Choose a set you can complete well rather than a mandatory launch count. The following three briefs are an example plan, not a rule that every hiking blog needs exactly three posts. Each answers a different reader need and can link naturally to the others.
| Article brief | Original evidence to collect | Useful next step |
|---|---|---|
| A familiar local route guide | Dated visit notes, own photos, official route and alerts links. | Direct readers to the live land-manager information. |
| What I learned preparing for that walk | The preparation choices you actually made, what changed and the limits of your experience. | Link relevant qualified planning guidance; distinguish reflection from instruction. |
| One gear item used on that walk | Actual use conditions, fit, duration, strengths and drawbacks. | Explain who it may suit and the commercial relationship, if any. |
Use descriptive titles, clear headings, accurate image descriptions and contextual links. Research the questions readers actually ask, but do not copy another publisher’s route text or pad every post with the same keyword phrases. A useful question may come from a real reader, your own notes or current official notices, not only an estimated search-volume number.
Test the pages before launch: one clear title, usable contents links, readable tables, correctly loaded images, working official links and a functioning correction/contact route. Check that forms and any optional newsletter explain what readers will receive. Use appropriate permission and unsubscribe controls rather than adding people because you found their addresses.
Promote relevant work and evaluate monetization realistically
Share a guide with people for whom it is useful, following the rules of the community or publication. A good collaboration adds information or a different perspective; guest posting solely to manufacture links is not a substitute for useful work. You can begin with one suitable channel instead of trying to maintain every social platform.
If you review gear, distinguish purchases, loans, gifts and sponsorships. For U.S. endorsements, the FTC’s disclosure guidance covers material connections and clear disclosure with the recommendation. Do not imply hands-on testing you did not perform or that commission determines the conclusion. Other markets and programs may have additional requirements.
Affiliate links earn only under the program’s qualifying rules; a click or sale is not automatically a paid commission. Sponsorship requires an actual agreement and deliverables. Selling a guide creates responsibilities to keep its description accurate and provide delivery and support. Advertising has eligibility and policy requirements: do not encourage readers to click ads to support you.
Keep actual travel, equipment, hosting, tool and time costs separate from revenue. There is no reliable universal timetable for replacing a salary or earning from a hiking blog. The first-offer guide helps you plan a deliverable offer and test the workflow without treating earnings as assured.
Maintain a guide, not just a publishing calendar
Choose a cadence you can sustain alongside research and hiking. New posts and existing-route checks are different work. A high publishing frequency is not evidence that old access information is still correct, and changing a page date without substantive checking does not make a trail report current.
- Keep the visit date and official-check date visible and separate.
- Review substantive reader corrections against the relevant source before adopting them.
- Add a clear notice or withdraw guidance when you learn of a material issue you cannot resolve promptly.
- Record what changed, particularly route variants, access restrictions, measurements or commercial claims.
- Inspect broken links, contact routes and phone layouts after site changes.
- Measure relevant reader questions, useful visits and real delivery or revenue outcomes; do not treat a ranking fluctuation as a complete assessment of quality.
A strong hiking blog gives readers original context and a transparent evidence trail. Start within the places and topics you can cover responsibly, explain uncertainty and spend time maintaining the work people may use when planning a real trip.
Starting a hiking blog FAQs
You can document your own learning and experiences honestly. That does not qualify you to provide technical instruction or safety assessments outside your competence. Choose a suitable scope, explain your experience and use relevant qualified and official sources.
There is no universal minimum. Launch when your core pages and a useful connected set of articles are accurate, complete and tested. The three-brief plan in this guide is an example, not an eligibility or ranking requirement.
You can publish a clearly labeled researched overview with appropriate sources and rights. Do not call it a firsthand report, invent conditions or imply you inspected the route. Readers should be able to tell what you personally observed and what came from elsewhere.
Use a sustainable review process and respond to material changes such as official closures, access rules or substantiated corrections. Preserve the original visit date and record subsequent checks. No fixed schedule makes a trail description a live conditions service.
Only when you have appropriate rights and can explain the source, route variant and limitations. A track or map in a blog does not guarantee current access, navigation accuracy or safety. Link the responsible land manager and relevant current planning information.
Possible models include qualifying affiliate commissions, sponsorships, advertising and your own products or services. Each has prerequisites, terms, costs and ongoing work. Disclose commercial relationships and do not promise a sale, income level or time to profitability.
No. Begin with tools that let you publish clear text, useful appropriately licensed images and maintain accurate information. Compare actual platform costs and limits. A phone camera can be sufficient for many documentary images; relevance and accurate context matter more than buying a large equipment collection.
Practical writing on building a site, growing an audience and sending email people open. No more than one a week.

Karan Singh Bhakuni
118 articles on the Grigora blog
More on Start a Blog
Start a Blog
How to Start a Wellness Blog: A Responsible Launch Plan
Choose a wellness topic you can cover responsibly, build a simple publishing setup, and launch with useful posts that separate personal experience from health claims.
12 Nov 202313 min read
Start a Blog
How to Start a Travel Blog: A Practical Launch Plan
Turn trips you know into helpful travel guides. Choose a platform, record the evidence behind each recommendation, publish a small connected collection, and keep changing details up to date.
2 Feb 202617 min read

Start a Blog
How to Start a Book Blog: Setup, Reviews and Launch
Choose your reading focus and platform, build a useful review format, and publish a small launch collection. Includes a review worksheet, budget checklist, spoiler policy, and first-month plan.
3 Feb 202617 min read