You can be a practicing artist, a student or a thoughtful art enthusiast. State your perspective honestly and build around work you can document. A portfolio presents selected work; the blog can explain the process and context behind it. Both can live on the same site if that suits your purpose.
Start a Blog Karan Singh BhakuniUpdated 3 Nov 2026
How to Start an Art Blog: From Studio Notes to Useful Posts
Karan Singh BhakuniUpdated 3 Nov 2026- 12 min read
- 9 sections
- 3 comparison tables
- 8 questions answered
The short answer
Start an art blog by choosing a reader, documenting work you can explain, and building a simple place to publish it. An effective post gives people more than a finished image: it can show a decision, a technique you tested, an exhibition you visited or a question you researched. Choose a platform that handles your images and writing well, then check the rights, captions and phone layout before sharing.
Want the site rather than the reading? Build one free with Grigora
Contents9 sections
Read nextHow to Start a DIY Blog That Wows: From Craft Room to Blogosphere
1. Choose a focus and the reader you want to help
Use a short brief: “I write about [medium or subject] for [particular reader], using [my practice, reporting or research].” Pick something you can return to with original material. A watercolor student explaining one experiment has a different blog from an exhibition reviewer or a digital artist documenting a client-safe workflow.
| Art blog direction | Useful starting material |
|---|---|
| Your practice and process | Sketches, studies, decisions, unsuccessful attempts and reflections on a finished piece. |
| A technique or learning project | A test you actually completed, with materials, stages, conditions and what remains uncertain. |
| Exhibitions, artists or art history | Your own observation, checked references, accurate artwork details and an appropriate image-use basis. |
| Tools and materials | Actual usage notes, the exact version or material, sample results, drawbacks and any commercial relationship. |
Choose a few connected categories rather than an empty category for every art form. A specific subject makes the blog easier to understand; it does not automatically establish expertise or earn rankings. Keep an About page with your real background, interests and a way for readers to report an error.
2. Test a real post before choosing a website
Draft a post with an artwork image, a detail crop, headings, a caption, a source link and a short process table. Preview that draft in the platform you are considering. Does it preserve the composition you intend? Can you add alt text and captions, manage portrait and landscape work, edit descriptions, organize posts and export your content? Check the actual experience instead of judging only a demo homepage.
A hosted service can be a practical way to start. A self-hosted setup brings a different set of responsibilities for hosting, software, backups and support. A custom domain is optional while you test the idea; see our guide to starting without buying a domain. Check renewal charges and account control before registering a name. A domain or available social handle does not settle every question about a name’s use.
Budget for the real cash due at signup and the ongoing term, including optional domain, apps and selling fees. Do not assume a free piece of software includes hosting or that an introductory rate is its renewal price. The blog cost guide shows how to compare those amounts. Keep your initial design and equipment purchases proportionate to the work you intend to publish.
If you test Grigora, use the 14-day website trial with your own draft. Compare the current plan allowances and editing workflow before committing; a paid website plan is needed afterward. Check any gallery, shop, newsletter or commenting features you need directly, rather than assuming they come with every template.
3. Turn a piece of work into a useful process post
Start with an actual decision: why you changed a composition, how two materials behaved in your test, or what you learned from revising a study. Collect notes and photographs as you work. This produces information that a reader cannot get simply by looking at the finished piece. Label a study, an experiment and a finished work accurately.
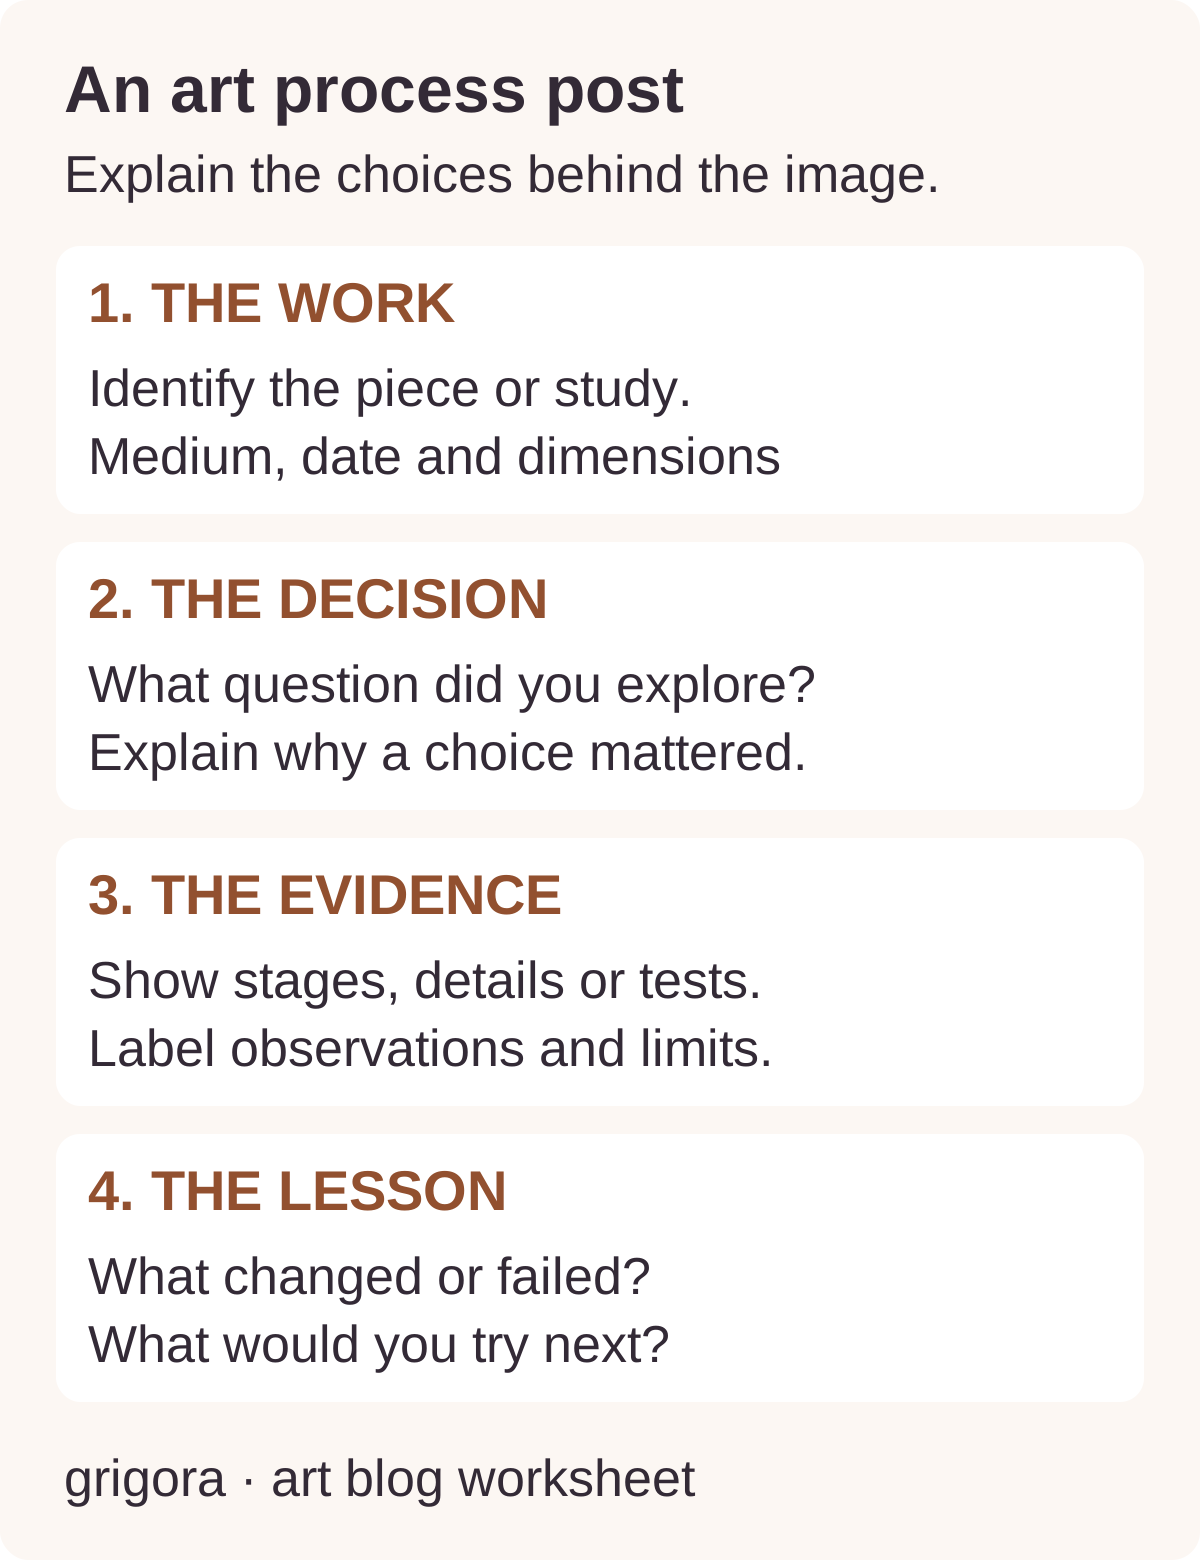
| Post section | What to include |
|---|---|
| Work and context | Identify the piece or study, medium, date and relevant dimensions or software version. Explain the project’s purpose without exposing confidential client details. |
| Question or decision | Describe the specific problem you explored, such as a composition change or a comparison of two surfaces. |
| Process evidence | Use selected stages, detail images or test notes to explain what you actually changed. Keep labels and units consistent. |
| What happened | Explain the result, a limitation or failed attempt, and what you would try next. Do not invent a successful outcome. |
| Reader’s next step | Offer a useful observation, a repeatable exercise within your competence or a reference to explore. Link a relevant finished piece if appropriate. |
A hypothetical outline might be “What changed when I moved the focal point in a small study?” Fill it with your own before, revision and final images, explaining the changes. Do not present that outline as a completed experiment until you have done the work. A material review should likewise distinguish your test from manufacturer claims and show what you did not test.
For an artist interview, prepare a specific question about their work, record answers accurately and agree how supplied images may be used. For an exhibition post, separate your interpretation from checkable facts such as title, artist, venue, date and medium. Link the institution’s current event page when giving visit information, and show when you checked it.
4. Prepare images that explain the work
Use consistent lighting and check the photograph against the artwork. Keep the camera aligned when documenting a flat piece, avoid glare and preserve the edges when the whole work matters. A close-up can reveal texture, but label it as a detail rather than a full view. Keep unedited originals and make a separate web copy; avoid filters that misrepresent work you are describing or selling.
Give each image a clear purpose. A finished view introduces the piece; a detail shows a particular choice; a sequence explains a process. Remove repetitive near-identical images. Write captions with the relevant artwork details and photo credit. For example, a caption record can contain artist, title, year, medium, dimensions, image creator and permission or license reference. Use only information you have checked.
Write alt text around the image’s purpose in the post. If you are explaining a composition, describe the relationship a reader needs to understand rather than inserting a list of SEO keywords. Put essential steps and comparisons in the article text too. The W3C guidance on complex images explains how short descriptions and fuller text descriptions work together when an image carries substantial information.
Preview your web copies at their actual display size, on a phone as well as a desktop. Keep labels large enough to read and avoid cropping away the feature the paragraph discusses. Our blog image-size guide and image filename guide cover practical preparation. A sharper, larger file is useful only when the reader can load and use it.
Also worth readingHow to Start a Coding Blog: Write Posts Readers Can Run
5. Keep an image-permission record
For each work or photograph, record why you can publish it. Your own photograph of someone else’s artwork does not by itself answer every rights question. Check relevant agreements for commissioned or collaborative work, and the institution’s stated image terms for museum material. Giving credit identifies a source; it is not a substitute for a needed permission or license.
- Identify the material: Save the work title, artist, image creator, source URL and the exact file you plan to use.
- Record the basis: Your relevant rights, a permission, a license, verified public-domain status, or a considered applicable exception.
- Check the scope: Does it cover your intended use, edits, cropping, commercial context and distribution?
- Keep the evidence: Save permission correspondence or license details and the date checked, then display the required credit.
A specific example is Creative Commons Attribution 4.0: its terms include appropriate credit, a license link and an indication of changes. Other licenses can have different conditions, and the license may not cover every relevant right. Read the exact license attached to the material rather than assuming every “Creative Commons” image has the same rules.
For US copyright questions, the Copyright Office’s fair-use explanation describes a case-specific assessment involving purpose, the nature of the work, the amount used and market effect. Calling a post “educational” or “criticism” does not automatically make every image use fair. Its FAQ also rejects a fixed safe number of words or percentage. Other countries have different rules; get appropriate advice when the particular use is uncertain.
6. Make a small editorial plan
A manageable pilot could include an introduction to your practice, one documented process post and a careful review or interview. That is a planning example, not a required number of launch posts. It lets you test different content formats while keeping the subject coherent.
Reserve time for making the work, taking images, writing, permissions, fact checking and publication. Choose a frequency that fits your studio or study commitments. Keep a backlog of questions rather than a calendar filled with articles you cannot yet support. An unfinished experiment can become a thoughtful reflection without pretending it succeeded.
Revisit old posts when a product changes, a link breaks, an attribution needs correction or your explanation improves. Preserve the distinction between the artwork’s creation date and the date you updated the article. Do not change an old exhibition recap so it appears to be a new visit.
7. Publish, check and share the article
- Reader task: The post answers a clear question, shows original observations and explains important limitations.
- Facts and rights: Names, dates, mediums, dimensions, links, credits and the basis for each image use are checked.
- Presentation: Whole-work views and crops are labeled, captions and alt text are useful, and image labels remain readable.
- Usability: Navigation, source links, galleries and tables work on a narrow screen and with a keyboard.
- Operations: The intended public or private audience setting is correct; subscriptions and contact routes work, and your work is backed up.
Ask someone from your intended audience to find a piece, understand a process step and follow a source. Revise what confused them. Check the public page when signed out before sending the link. If the layout breaks, the mobile website guide offers a useful testing sequence.
Share the post in an art community when it answers a relevant question and links are permitted. Use a clear title and a description that reflects the article, then link related work contextually. Track actual queries, pages and impressions over comparable periods in search tools. Images, keywords and regular posting do not guarantee more impressions, sales or a number-one ranking.
8. Choose revenue options that fit the work
| Possible route | What a reader or buyer needs to know |
|---|---|
| Originals, prints or digital files | What is supplied, dimensions or file format, edition details where relevant, price, delivery and the applicable purchase or usage terms. |
| Lessons or resources | The actual contents, intended level, what you can teach and what is outside the offer. |
| Affiliate or sponsored material | The brand relationship, what you actually used and how the recommendation is funded. |
Use a small budget and measure real results. Sales, commissions and ad eligibility are uncertain. If you sell digital material, make the file, delivery and usage terms clear; the digital-products guide works through those decisions. Do not sell material you cannot authorize others to use.
For US-facing endorsements, the FTC disclosure guide covers payment, free products and other material brand connections. Put an understandable explanation with the recommendation and describe your experience honestly. A sponsor should not require a fabricated test or a guaranteed positive review. Check other applicable rules for your audience and location.
Art blog FAQs
No. You can document your own learning, research or appreciation while explaining your actual background. Describe what you observed and checked, and do not invent expertise, exhibitions visited or work you created.
They can share a site. Use portfolio pages to present selected work clearly and blog posts to explain process, context or research. Organize navigation around what your reader or potential client wants to find.
No. A platform-provided address can be enough to test the idea. Check plan limits, account control and export options. If you register a custom domain, budget for renewal and check the name appropriately.
Credit alone does not establish the right to publish it. Check the work and image rights, the exact license or permission, or a relevant exception. Keep records and follow the required terms rather than assuming that online availability means free reuse.
No. US fair use is assessed in context using multiple factors; educational purpose alone does not decide it. The rules differ by jurisdiction. Seek suitable advice when a particular use is uncertain.
Use enough to answer the question clearly. Show distinct, useful views and explain the important decisions in text. There is no universal post length, launch count or image quota that guarantees search performance.
It can help organize or edit a draft, but do not present generated images as stages of work you actually made or invent an interview. Clearly identify relevant generated material and verify factual claims, quotations and permission needs yourself.
There is no dependable income deadline. Results depend on the work, audience, offers, costs and eligibility. Start with a publishing setup you can maintain without assuming immediate sales or advertising revenue.
Practical writing on building a site, growing an audience and sending email people open. No more than one a week.

Karan Singh Bhakuni
118 articles on the Grigora blog
More on Start a Blog
Guides
How to Start a DIY Blog That Wows: From Craft Room to Blogosphere
Introduction "The only limit to your DIY project is your imagination." The Popularity and Impact of DIY Blogs DIY blogs have surged in popularity over the last few years, becoming a go-to resource…
2 Oct 20238 min read
Start a Blog
How to Start a Coding Blog: Write Posts Readers Can Run
Choose a reader and a coding problem you can reproduce. Build a simple blog and publish useful examples with versions, commands, expected output and honest testing limits.
1 Oct 202310 min read
Start a Blog
How to Start a Technical Blog: Publish a Tested First Post
Build a technical blog around instructions readers can verify. Define the audience, test your publishing platform, document prerequisites and outputs, and maintain posts as tools change. Includes an…
12 Oct 202310 min read